četvrtak, 31. siječnja 2019.

Add Story Highlights On Instagram


How To Add Story Highlights On Instagram:
Method 1: Adding Your Current Story to a Highlight


Open your Instagram (If you don’t have one, you can download it from here).


Then go to “Your Story” by tapping on your profile picture, either in the story row, on the feed tab or on your profile picture itself.


Now, select the image or video you want to upload and send it to your story by tapping on the blue button from the bottom right corner.


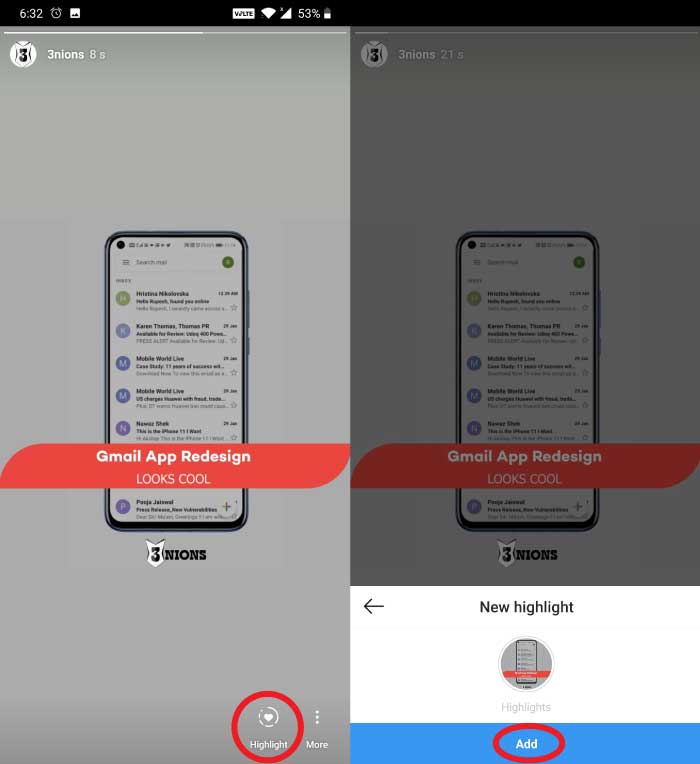
Once your story is uploaded, go back to it and you will find a “Highlight” option on the bottom of your screen. Tap on it, and you will get two other options, first is “New”. And in the second option, you will see other story highlights created by you. So, tap on them and add your new story to it. Or if you haven’t made any story highlight(which is why you are reading this article), then tap on “New”, add a name to your highlight and then confirm your process by tapping on the blue “Add” button. That’s it your new story light will be added to your profile now.
Method 2: Creating a Highlight from the Stories Archive


Open your Instagram (If you don’t have one, you can download it from here).


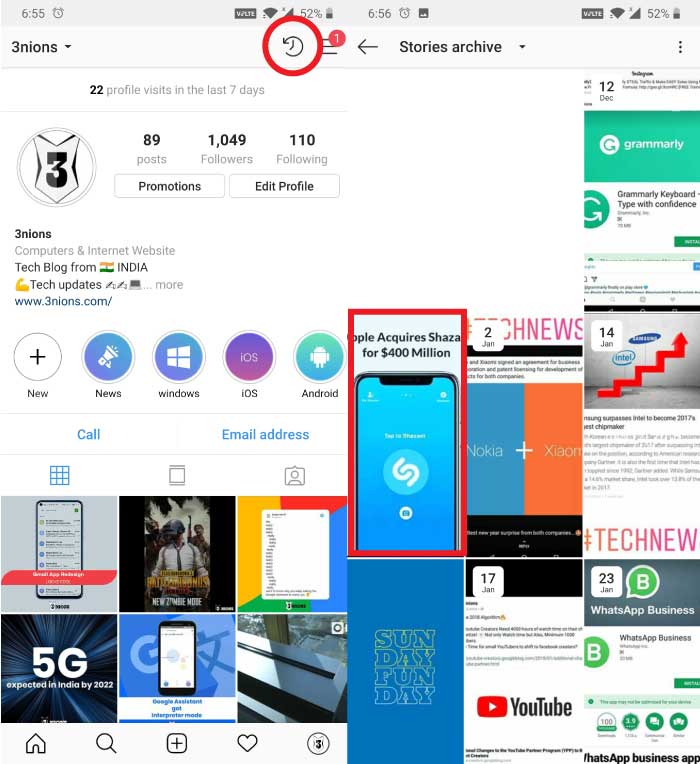
Now, go to your profile and tap on the clock like icon from the top right corner. (This is your archive section).


Once opened, you will see the stories that you would have uploaded in the past.


Now tap on the story that you want to add as a highlight, and then you will find the “Highlight” option from the bottom of your screen. (You can select as many images or videos as you want).


Now again, tap on “New” if you want to make a new highlight or tap on your existing ones and then simply add your archive story to your highlight. And that’s it your past story now, will get added to the story highlights.

So, here are the two methods through which one can easily add story highlights on Instagram without any hassle. Now, according to your preference, you can either add a story to highlight within 24 hours (until your story disappears). Or if it disappears, then also you can add it to highlights by going to your archive section. But if you want to delete your story highlight for any reason, then go to your profile, do a long press on the highlight that you want to delete and you will find the “Delete” option. Tap on it, and that’s it your story highlight will get deleted.Sponsor ads:

Gihosoft Free iPhone Data Recovery:iphonerecovery.com

Free iPhone Data Recovery Software for Windows/Mac

Recover up to 12+ types of files, including contacts, SMS, photos, WhatsApp, Viber, notes, etc.

Restore lost data from iOS devices directly or from iTunes and iCloud backup

Recover iPhone data lost due to iOS upgrade/jailbreak, accidental deletion, device lost or broken

Support all the latest iPhone, iPad and iPod Touch

Both Free and Pro version.

If you lost data after you updated to a new iPhone, you can always use Gihosoft iPhone Data Recovery to get the data back from the old iPhone or backup.

Top 10 Best FRP Bypass Tools to Bypass Google Account on Android Device 2019

Worth reading:download youtube 1080p

Jihosoft Android Data Recovery: the best Android Data Recovery software for Windows and Mac to recover deleted contacts, messages, photos, videos, WhatsApp and etc from Android

If you use android phones, please choose Gihosoft Android Data Recovery

ponedjeljak, 21. siječnja 2019.

2019 Best Solutions for How to Wipe iTunes Library


1. Delete iTunes Library File

If you don’t want to use third-party software to wipe iTunes library, then you will be glad to know that you can wipe the library by manually deleting iTunes library file. Keep in mind that this method will reset everything in iTunes and all your library lists, apps, listings, playlists, etc. will be removed. So, creating a backup first is recommended.

Follow these instructions:

Step 1: Close iTunes if it is opened.

Step 2: If you are using Windows 10, then navigate to this folder: C:\Users\username\Music\iTunes\. If you are on Mac, then you will need to navigate to this folder: /Users/username/Music/iTunes/

Step 3: Once in the folder, find and right-click on the file called “iTunes Music Library.xml”. After that, click on “Rename” then rename the file as “iTunes Music Library.old”.


Step 4: Now find another file called “iTunes Library.itl” and rename it as “iTunes Library.old”.

Step 5: Now launch iTunes. You will see that the iTunes library is wiped and all your ratings, playlists, etc. are cleared out. iTunes will automatically create a new library for your media files.
2. Select All Then Delete

There is another method to wipe iTunes library on both Windows and Mac. In this method, you will need to manually select all the files in iTunes and delete them. Since you will need to select files in different categories, this method to erase iTunes library is relatively lengthy.

Follow these instructions:

Step 1: Launch iTunes on your Windows PC or Mac.

Step 2: In iTunes, navigate to the list of media that you wish to wipe.

Step 3: If you are using Mac, then press and hold ‘Command’ button and then press ‘A’. If you are using Windows, then use ‘Ctrl+A’. All the files in the list of media will be selected.

Step 4: Now press the ‘Delete’ key and then confirm your action by selecting the ‘Delete Items’ option.

Step 5: Repeat these steps for deleting media in other categories.

Sponsor ads:

Gihosoft Free iPhone Data Recovery:iphonerecovery.com

Free iPhone Data Recovery Software for Windows/Mac

Recover up to 12+ types of files, including contacts, SMS, photos, WhatsApp, Viber, notes, etc.

Restore lost data from iOS devices directly or from iTunes and iCloud backup

Recover iPhone data lost due to iOS upgrade/jailbreak, accidental deletion, device lost or broken

Support all the latest iPhone, iPad and iPod Touch

Both Free and Pro version.

If you lost data after you updated to a new iPhone, you can always use Gihosoft iPhone Data Recovery to get the data back from the old iPhone or backup.


Worth reading:download youtube 1080p

nedjelja, 13. siječnja 2019.

How to Manually Uninstall iTunes on a Windows PC


How to Manually Uninstall iTunes on a Windows PC

If you prefer to manually uninstall iTunes from your Windows PC, then you should know that you ought to follow the step-by-step procedure for uninstalling iTunes and its related software components.

Here are the steps to follow if you want to manually uninstall iTunes from Windows PC:

Step 1. Click on the Windows Menu, scroll down to iTunes, right-click on it, and select “Uninstall”. Restart your PC after uninstalling iTunes.

Step 2. Go to “Control Panel > Programs & Features” and remove all these programs in this order:


QuickTime (if it exists)


iTunes


Apple Software Update


Apple Mobile Device Support


iCloud


MobileMe


Bonjour


Apple Application Support (32-bit)


Apple Application Support (64-bit)


Step 3. Restart your PC and delete the following folders if they exist:


C:\Program Files\Bonjour


C:\Program Files\Common Files\Apple


C:\Program Files\iPod


C:\Program Files\iTunes

These may also exist on 64-bit systems:


C:\Program Files (x86)\Bonjour


C:\Program Files (x86)\Common Files\Apple


C:\Program Files (x86)\iPod


C:\Program Files (x86)\iTunes

Note: C:\ drive and Program Files may be replaced with a different letter or name in your system respectively.
Part 3. How to Reinstall iTunes on Windows PC

If you successfully uninstall iTunes from your PC, you can now reinstall iTunes on your PC following these steps:

Step 1. Go to Apple page or Microsoft Store and download iTunes installer files. Then, choose a folder to save the files.

Step 2. Run the iTunes installer files and then click “Next” to go to terms and condition page. Check the box and click “Next”.

Step 3. Choose the correct installation option from the basic setup options, and click “Finish Installing” to finish the installation process.

Step 4. Now, restart your PC.
Tip: What Kinds Problem that Can Be Solved via Uninstalling and Reinstalling iTunes

Some of problems that can be solved by removing and reinstalling iTunes and its related software components include:


If iTunes is malfunctioning, having errors/issues, or problems.


iTunes becomes unresponsive, freezes regularly, or clashes.


When iTunes backup, sync and restore function is not working.


When iTunes update can’t install.


When you’re asked to uninstall and reinstall iTunes by AppleCare, alert dialog.


Sponsor ads:


Gihosoft Free iPhone Data Recovery:https://www.gihosoft.com/iphone-data-recovery-free.html


Gihosoft iPhone Data Recovery Free


Free iPhone Data Recovery Software for Windows/Mac


Recover up to 12+ types of files, including contacts, SMS, photos, WhatsApp, Viber, notes, etc.


Restore lost data from iOS devices directly or from iTunes and iCloud backup


Recover iPhone data lost due to iOS upgrade/jailbreak, accidental deletion, device lost or broken


Support all the latest iPhone, iPad and iPod Touch


Both Free and Pro version.


If you lost data after you updated to a new iPhone, you can always use Gihosoft iPhone Data Recovery to get the data back from the old iPhone or backup.You may also like: iphonerecovery.com


If you use android phones, please choose Gihosoft Android Data Recovery.


With Gihosoft Android Data Recovery, no longer afraid of data loss!


Must read:Youtube video downloader for pc


Gihosoft RePicvid Free Photo Recovery Software provides a free photo recovery software for windows to help users recover the deleted or lost photo for free.


Jihosoft Android Data Recovery: the best Android Data Recovery software for Windows and Mac to recover deleted contacts, messages, photos, videos, WhatsApp and etc from Android devices.Tips:How to transfer messages from iPhone to iPhone


jihosoft Free iPhone Data Recovery